
1. Avro
Avro Type 으로 return 하도록 하겠습니다.
- test_table
- test_table_column

- TestTable.java
test_table(id)과 test_table_column(test_table_id) 테이블을 조인하는 model을 설정합니다.
JPA를 이용하면 어노테이션 기반으로 다음의 설정들을 추가할 수 있습니다.
(여기서 JSONManagedReferenced 를 추가하면 재귀 없이 추가가 가능합니다.)
package com.example.my_rest_api.model;

import com.fasterxml.jackson.annotation.JsonManagedReference;
import jakarta.persistence.*;

import java.util.ArrayList;
import java.util.List;

@Entity
@Table(name = "test_table")
public class TestTable {

    @Id
    @GeneratedValue(strategy = GenerationType.IDENTITY)
    private Long id;
    private String name;

    // JSONManagedReferenced 를 추가하면 json object를 return 할 수 있다. (재귀 없이!)
    @OneToMany(mappedBy = "testTable", cascade = CascadeType.ALL, orphanRemoval = true)
    @JsonManagedReference
    private List<TestTableColumn> columns = new ArrayList<>();

    public TestTable() {}

    public TestTable(Long id, String name, List<TestTableColumn> columns){
        this.id = id;
        this.name = name;
        this.columns = columns;
    }

    public Long getId() {
        return id;
    }

    public void setId(Long id) {
        this.id = id;
    }

    public String getName() {
        return name;
    }

    public void setName(String name) {
        this.name = name;
    }

    public List<TestTableColumn> getColumns() {
        return columns;
    }

    public void setColumns(List<TestTableColumn> columns) {
        this.columns = columns;
    }

    public void addColumn(TestTableColumn column) {
        columns.add(column);
        column.setTestTable(this);
    }

}
- TestTableColumn.java
마찬가지로 조인할 모델들을 annotation 기반으로 설정합니다.
package com.example.my_rest_api.model;

import com.fasterxml.jackson.annotation.JsonBackReference;
import jakarta.persistence.*;

@Entity
@Table(name = "test_table_column")
public class TestTableColumn {

    @Id
    @GeneratedValue(strategy = GenerationType.IDENTITY)
    private Long id;

    // 재귀 없이 json object를 추가하기 위해 JsonBackReference를 추가함.
    @ManyToOne
    @JoinColumn(name = "test_table_id")
    @JsonBackReference
    private TestTable testTable;

    private String columnName;

    private String columnDataType;

    public TestTable getTestTable() {
        return testTable;
    }

    public void setTestTable(TestTable testTable) {
        this.testTable = testTable;
    }

    public Long getId() {
        return id;
    }

    public void setId(Long id) {
        this.id = id;
    }

    public String getColumnName() {
        return columnName;
    }

    public void setColumnName(String columnName) {
        this.columnName = columnName;
    }

    public String getColumnDataType() {
        return columnDataType;
    }

    public void setColumnDataType(String columnDataType) {
        this.columnDataType = columnDataType;
    }

}
- RestControll.java
package com.example.my_rest_api.controller;

import com.example.my_rest_api.model.TestTable;
import com.example.my_rest_api.service.RestService;
import org.springframework.beans.factory.annotation.Autowired;
import org.springframework.http.ResponseEntity;
import org.springframework.web.bind.annotation.GetMapping;
import org.springframework.web.bind.annotation.RequestMapping;

import java.util.List;

@org.springframework.web.bind.annotation.RestController
@RequestMapping("/api")
public class RestController {

    @Autowired
    private RestService restService;

    // Avro Schema를 조회
    @GetMapping("/schemas/avro")
    public String readAvroSchema() {
        return restService.readAvroSchema().toString();
    }

}
- RestService.java
서버가 시작 될 때, 자동으로 데이터가 등록되도록 init 함수를 구현하였습니다.
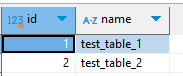
총 테이블은 2개로
- test_table_1 (table_column_1_1 (string), table_column_1_2 (long), table_column_1_3 (timestamp))
- test_table_2 (table_column_2_1 (string), table_column_2_2 (long), table_column_2_3 (timestamp))
이렇게 구성됩니다.
@PostConstruct
@Transactional
public void init() {
    // 애플리케이션이 시작될 때 테이블 추가
    TestTable testTable = new TestTable();
    testTable.setName("test_table_1");

    TestTableColumn testTableColumn1 = new TestTableColumn();
    testTableColumn1.setColumnName("table_column_1_1");
    testTableColumn1.setColumnDataType("string");

    TestTableColumn testTableColumn2 = new TestTableColumn();
    testTableColumn2.setColumnName("table_column_1_2");
    testTableColumn2.setColumnDataType("long");

    TestTableColumn testTableColumn3 = new TestTableColumn();
    testTableColumn3.setColumnName("table_column_1_3");
    testTableColumn3.setColumnDataType("timestamp");

    testTable.addColumn(testTableColumn1);
    testTable.addColumn(testTableColumn2);
    testTable.addColumn(testTableColumn3);

    testTableRepository.save(testTable);

    TestTable testTable2 = new TestTable();
    testTable2.setName("test_table_2");

    TestTableColumn testTableColumn2_1 = new TestTableColumn();
    testTableColumn2_1.setColumnName("table_column_2_1");
    testTableColumn2_1.setColumnDataType("string");

    TestTableColumn testTableColumn2_2 = new TestTableColumn();
    testTableColumn2_2.setColumnName("table_column_2_2");
    testTableColumn2_2.setColumnDataType("long");

    TestTableColumn testTableColumn2_3 = new TestTableColumn();
    testTableColumn2_3.setColumnName("table_column_2_3");
    testTableColumn2_3.setColumnDataType("timestamp");

    testTable2.addColumn(testTableColumn2_1);
    testTable2.addColumn(testTableColumn2_2);
    testTable2.addColumn(testTableColumn2_3);

    testTableRepository.save(testTable2);

    System.out.println("Table Saved 1: " + testTable);
    System.out.println("Table Saved 2: " + testTable2);
}
DB에 등록된 데이터들을 가져와 SchemaBuilder를 이용하여 Avro Schema 를 response에 담아 return 합니다.
public Schema readAvroSchema() {

    List<TestTableColumn> columns = testTableColumnRepository.findAll();

    SchemaBuilder.FieldAssembler<Schema> schemaBuilder = SchemaBuilder.record("TestTableAvro")
            .namespace("com.example.my_rest_api.model")
            .fields();

    for (TestTableColumn column : columns) {

        Map<String, String> fields = new HashMap<>();
        fields.put(column.getColumnName(), column.getColumnDataType());

        // 필드 동적으로 추가
        for (Map.Entry<String, String> field : fields.entrySet()) {
            String fieldName = field.getKey();
            String fieldType = field.getValue();

            switch (fieldType) {
                case "int", "integer":
                    schemaBuilder.name(fieldName).type(Schema.createUnion(Schema.create(Type.NULL), Schema.create(Type.INT))).noDefault();
                    break;
                case "string":
                    schemaBuilder.name(fieldName).type(Schema.createUnion(Schema.create(Type.NULL), Schema.create(Type.STRING))).noDefault();
                    break;
                case "boolean":
                    schemaBuilder.name(fieldName).type(Schema.createUnion(Schema.create(Type.NULL), Schema.create(Type.BOOLEAN))).noDefault();
                    break;
                case "long":
                    schemaBuilder.name(fieldName).type(Schema.createUnion(Schema.create(Type.NULL), Schema.create(Type.LONG))).noDefault();
                    break;
                case "float":
                    schemaBuilder.name(fieldName).type(Schema.createUnion(Schema.create(Type.NULL), Schema.create(Type.FLOAT))).noDefault();
                    break;
                case "double":
                    schemaBuilder.name(fieldName).type(Schema.createUnion(Schema.create(Type.NULL), Schema.create(Type.DOUBLE))).noDefault();
                    break;
                case "timestamp":
                    Schema longWithTimestampMillis = Schema.create(Type.LONG); // long 타입 생성
                    longWithTimestampMillis.addProp("logicalType", "timestamp-millis"); // logicalType 추가
                    schemaBuilder.name(fieldName).type(Schema.createUnion(Schema.create(Type.NULL), longWithTimestampMillis)).noDefault();
                    break;
                default:
                    throw new IllegalArgumentException("지원되지 않는 필드 타입: " + fieldType);
            }
        }

    }

    return schemaBuilder.endRecord();
}
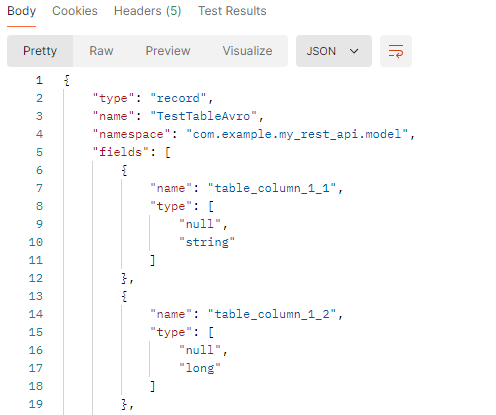
- 결과
이제 호출에 대한 결과값을 확인해보도록 합니다.
- response (화면 일부)

- response (전체)
{
    "type": "record",
    "name": "TestTableAvro",
    "namespace": "com.example.my_rest_api.model",
    "fields": [
        {
            "name": "table_column_1_1",
            "type": [
                "null",
                "string"
            ]
        },
        {
            "name": "table_column_1_2",
            "type": [
                "null",
                "long"
            ]
        },
        {
            "name": "table_column_1_3",
            "type": [
                "null",
                {
                    "type": "long",
                    "logicalType": "timestamp-millis"
                }
            ]
        },
        {
            "name": "table_column_2_1",
            "type": [
                "null",
                "string"
            ]
        },
        {
            "name": "table_column_2_2",
            "type": [
                "null",
                "long"
            ]
        },
        {
            "name": "table_column_2_3",
            "type": [
                "null",
                {
                    "type": "long",
                    "logicalType": "timestamp-millis"
                }
            ]
        }
    ]
}
- exampel 결과값
여기서 생성된 response와 형태가 동일한지 한 번 확인해봅니다.
{
  "type": "record",
  "name": "TestTableAvro",
  "namespace": "com.example.my_rest_api.model",
  "fields":[
    {"name":"table_column_1","type":["null","string"]},
    {"name":"table_column_2","type":["null","long"]},
    {"name":"table_column_3","type":["null",{"type":"long","logicalType":"timestamp-millis"}]}
  ]
}
형태는 동일한 것을 확인하였습니다.
2편에서는 json 형태의 return type을 확인해보도록 하겠습니다. :)
'Apache Avro' 카테고리의 다른 글
| Rest-API 구현 관련 과제 - 3 (예외처리) (0) | 2024.11.03 |
|---|---|
| Rest-API 구현 관련 과제 - 2 (JSON) (0) | 2024.10.28 |
| Rest-API 구현 관련 과제 (0) | 2024.10.09 |
| Spring Boot REST API 및 DB 연동 실습 - 3 (DBtoAvro) (0) | 2024.09.29 |
| Spring Boot REST API 및 DB 연동 실습 - 2 (JPA) (0) | 2024.09.28 |


댓글